Changing the strings on a classical guitar is one of the most important maintenance tasks you will perform as a guitarist. Fresh strings restore brightness, improve intonation, and make playing more enjoyable. Unlike steel-string guitars, classical guitars use nylon strings that require a specific tying technique at the bridge — and getting that knot right is the key to strings that stay in tune and do not slip. This guide walks you through every step of the process, from removing old strings to winding the tuning pegs correctly.
When Should You Change Classical Guitar Strings?
As a general rule, regular players should replace their strings every 3 to 6 months. That said, the right moment depends on how much you play and what you hear. Strings that have lost their brightness, feel sticky or rough under your fingers, or cause intonation problems higher up the neck are telling you it is time for a change. Professional guitarists often change strings before every important performance to ensure a consistent, bright tone.
Nylon strings do not corrode the way steel strings do, but they degrade in other ways: they absorb oils and sweat from your fingers, they stretch unevenly over time, and the surface of wound bass strings can become rough or pitted. If you notice that your guitar is difficult to tune or that the upper frets sound noticeably flat even after careful tuning, fresh strings will almost certainly help.
Choosing the Right Strings
Before you start, choose a string set that suits your playing style. The most important decision after brand is tension level. Normal tension strings offer a balanced feel and are a good starting point for most players — they are easy on the fingers and produce a warm, full tone. High tension strings are louder and more responsive to aggressive playing, while extra high tension delivers maximum projection at the cost of harder left-hand work.
Well-regarded brands used by professional and amateur players alike include Savarez, , Hannabach, Knobloch, and La Bella. Each brand has its own tonal character: Hannabach is known for its warm, rich bass strings;.
If you are unsure where to start, a normal tension set from any of these manufacturers is a safe and widely used choice. You can experiment with different brands and tensions once you are comfortable with the restringing process.
What You Need
- A new set of classical guitar strings
- A tuner (clip-on or app-based)
- A string winder (optional but helpful)
- Wire cutters or scissors for trimming
- A soft cloth to wipe down the guitar
You do not need a guitar stand or any specialised equipment. A flat surface covered with a soft towel works perfectly well.
Step-by-Step: How to Restring a Classical Guitar
Step 1 – Loosen the Old Strings
Turn the tuning pegs to loosen each string until it has no tension. Work through all six strings before removing any of them. This is safer than removing strings one at a time because it releases neck tension gradually. Once the strings are slack, you can proceed to remove them.
Step 2 – Remove Strings from the Bridge
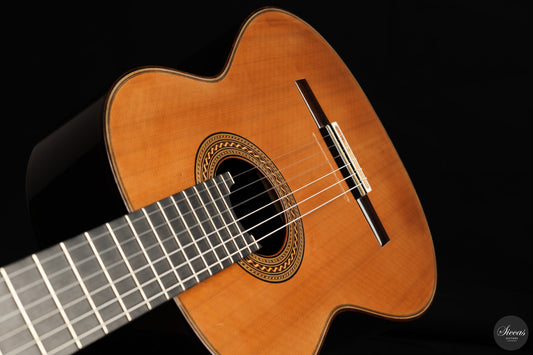
Classical guitars use a tie-block bridge: strings are held in place by a knot rather than bridge pins. Gently pull the knotted end of each string loose from the tie block. If the knot is very tight, you can carefully cut the string close to the tie block — just make sure you do not scratch the bridge surface. Take your time here and do not use excessive force.
Step 3 – Remove Strings from the Headstock
Unwind the remaining string from the tuning peg roller and slide it out. Check the peg holes for any debris and wipe the entire guitar neck, fingerboard, and body with a soft cloth while the strings are off — this is the easiest time to clean the guitar thoroughly.
Step 4 – Tie the New Strings at the Bridge
This is the most important step and the one that causes the most frustration for beginners. Thread the string through the hole in the tie block, leaving about 3 to 4 cm of string on the far side. Loop that short end back over the main string and then under itself — essentially creating a half-hitch knot. For treble strings (1, 2, 3), make two passes under and over to create a secure knot. For bass strings (4, 5, 6), one loop is usually sufficient because the wound surface grips more easily. Pull the knot tight toward the rear of the bridge and make sure it sits flush against the back edge of the tie block. A poorly tied knot will slip under tension and throw your tuning off.
Step 5 – Thread the String through the Tuning Peg
Run the string up the neck and through the hole in the tuning peg roller. Pull the string through until there is roughly 4 to 5 cm of slack between the string and the fingerboard at the midpoint of the neck. This slack is what you will wind around the roller — too little and you will not get enough winds; too much and the peghead becomes cluttered.
Step 6 – Wind the Tuning Peg
Hold the string in place with one hand while you begin winding with the other. For treble strings, aim for 2 to 3 winds around the roller. For bass strings, 3 to 4 winds are recommended. Each successive wind should sit below the previous one, traveling toward the inner face of the headstock. This direction of winding locks the string against the roller and helps prevent slipping. Ensure the string is seated cleanly in the nut slot as you wind.
Step 7 – Tune Up Slowly
Bring the string up to pitch gradually, stopping to check the tuning with a tuner several times. Do not rush this — tuning too fast risks snapping a string. Once all six strings are at or near concert pitch, go back and retune from the beginning, as tightening one string shifts tension across the whole guitar.
Step 8 – Stretch the Strings
New nylon strings stretch significantly and will go flat repeatedly in the first days after installation. You can speed up the settling process by gently pulling each string away from the fingerboard a few times along its full length, then retuning. Repeat this several times per session. Expect to retune frequently for two to four days before the strings fully stabilise. This is completely normal behaviour for nylon strings and not a sign that something went wrong.
Common Mistakes to Avoid
- Slipping bridge knots – Always test the knot by pulling the string firmly before winding onto the peg. If it slips at the bridge, the string will not hold tune.
- Too few winds at the peg – Fewer than two winds on a treble string can cause it to slip, especially while the string is still stretching.
- Installing strings in the wrong order – String sets are labelled 1 (highest, thinnest) through 6 (lowest, thickest). Double-check before tying.
- Neglecting the nut slots – If a string buzzes or catches when tuning, check that it is sitting properly in its nut slot.
How String Choice Affects Your Playing
Beyond the practical task of restringing, the strings you choose have a real impact on the sound and feel of your instrument. On a concert-level guitar, experimenting with different string brands and tensions can meaningfully change the instrument's response and tonal colour. If you play a classical guitar with a cedar top, lower-tension strings often complement the top's natural warmth. On a spruce-top guitar, higher-tension strings can add the projection and clarity that spruce responds well to — an aspect explored in depth in our spruce vs. cedar tone comparison.
Players learning the repertoire of the great masters — from Francisco Tárrega to Bach on classical guitar — will find that the right strings make technically demanding music more accessible. String choice is also relevant for specific pieces: the tremolo in Recuerdos de la Alhambra, for instance, is often easier to execute cleanly with well-matched tension and fresh treble strings.
How Often Should You Restring?
For players who practise regularly, every 3 to 6 months is a reasonable target. If you notice any of the following, change your strings sooner regardless of schedule: dull or muted tone, difficulty staying in tune, rough or discoloured string surface, or a noticeable difference in brightness between old and new strings when you test one.
Students working through a structured learning plan often underestimate how much fresh strings improve the playing experience. Keeping your strings in good condition is a straightforward way to make practice more rewarding and to hear your progress more clearly.
Final Thoughts
Restringing a classical guitar takes patience the first few times, but it quickly becomes a routine part of caring for your instrument. The bridge knot is the skill that matters most — once you can tie it reliably, the rest of the process is straightforward. Invest in a quality string set from a reputable brand, give the strings a few days to settle, and enjoy the renewed brightness and response that fresh strings bring to every note you play.